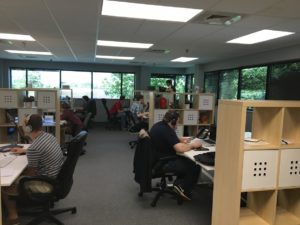
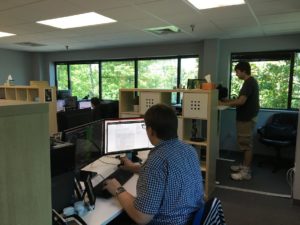
 OmniSpear is excited to host Dayton PHP and their upcoming meeting on Git and Gitflow. The presentation will take place tomorrow at our conference room from 6:00-8:00 p.m. with special guest speaker, Nate Denlinger. Nate has been a developer for over 9 years and will be giving us an overview of the ins and outs of Git and workflow processes. We are excited to learn the basics of streamlining with GIT as well as learning about real life experiences during the round-table. For more information , or to RSVP, check out the Dayton PHP’s event site.
Summer Coding Cookout
 There are few better ways to celebrate the summer than putting on a great cookout. We’ve seen the talent our team has on the computer, and now we’ve tested their skill on the grill! We’re proud to say it was a massive success, resulting in some killer burgers and delicious desserts. We hope everyone is getting out and enjoying the summer weather!
Website Refresh for Clear My Head
 OmniSpear is excited to announce the latest website refresh for Clear My Head. We’ve updated the website to a mobile-friendly, more modern look and feel, with easier navigation to the increasing services and products. Sticking to the heart of our concept for the original site, we’ve kept the unique and bright color palette for visual appeal, while streamlining page access and updating photos to the latest products. Clear My Head features a Certified Clinical Aromatherapist and Licensed Massage Therapist, with specialty in the latest SHIFT massage treatments. They also develop and sell products using sustainable, organic and natural ingredients that smell great and do wonders for sinuses. Visit Clear My Head to explore and book your appointment today. If you need a new site or a refresh to your existing, let us know and see what we can do for you.
OmniSpear Hosting PHP Meetup on Making Dev Environments Work For You
 OmniSpear is excited at the opportunity to welcome Dayton PHP and their members to our office on June 20th. The event will be hosted by Brian Retterer, a veteran developer of PHP since the release of PHP 5, who now works as the PHP Developer Evangelist for Stormpath. During this session, Brian will give a tour of all the new and different features of the language, as well as provide techniques for becoming a more efficient developer. The meetup will also focus on providing some great tips and tricks for helping speed up daily work! Be sure to check out the meeting agenda in the link below as well as stay tuned for future meetups at OmniSpear.
For more information, tune into the event website
OmniSpear Welcomes Ryan Harris!
 We are happily expanding the team here at OmniSpear and proudly welcome our newest member, Ryan Harris. Ryan is a recent graduate from the School of Advertising Art and has been interning with us over the Spring. He will soon be joining the company as our official employee this summer, and we are eager for him to get started. Ryan will come as an addition to our art-minded (and techie) crew at the office, specializing on the front-end of web presence. Our team had a chance to attend the SAA Portfolio show this past Friday to cheer on Ryan as he debuted his portfolio and final projects for graduation. We are so proud of the work he created and know he will bring that same creativity to our clients. Welcome Ryan!
OmniSpear Has Upgraded! Come See Our New Office Space.
OmniSpear, Inc. Has Upgraded! Come See Our New Office Space.
OmniSpear Supports the Dayton PHP Meetup Group
The PHP programing language has been part of web development for over two decades and has been a foundation for web development as other programing languages appear then fade away. You will find PHP is the heart of many popular applications like WordPress, Drupal, Joomla and SugarCRM. With the release of PHP 7 and it’s extreme performance increases we find PHP’s popularity on the rise again. Helping PHP’s renewed popularity is support from the Laraval framework. Laraval is “the PHP framework for web artisans”.
This is why OmniSpear has a strong PHP development team – we know the power of PHP, wether it’s customizing WordPress or creating data pipelines for line-of-business applications.
Dayton PHP Meetup Group
With our expertise in PHP it makes sense that we would support the PHP industry. So, when Brian Retterer approached us about a new Dayton PHP Meetup group it was a natural fit for us to host their meetings.
On May 17th we hosted the first Dayton PHP meeting here at OmniSpear.

And what a great start it was!
We had seven people in the meeting. Our guest speaker was Emily Stamey and she joined us via Google Hangouts. Emily shared her experience on working with North Carolina State University to “bootstrap” their legacy CodeIgniter project.
Emily started the meeting by clarifying some terminology like “legacy software”, “spaghetti code”, “lasagna code” and “refactoring”. She then talked about the scholarship application and requirements they needed to comply to as the engaged the project. She emphasized the importance of surveying the application by studying the codebase and reviewing new feature requests then get user feedback.
Emily talked about gaining user trust and always be honest with users about errors in the application. She covered setting expectations with the client, setting priority and scope of work.
Diving In
After covering all the planning topics, it was time to dive into the work. Emily started with importance of adding version control for their source code and end the bad behavior of developing in the production environment.
Emily showed showed us the various software tool packages they used for testing their code, adding templates for front-end content, mitigating vulnerabilities and database management.
Emily closed the presentation by summarizing what was learned and answered several questions from the group.
Looking Forward
Brian Retterer has ambitious plans for the Dayton PHP group. For our next meeting he will be walking through a complete Laravel build, from start to finish. He plans to have “deep dive” workshops, training for real-world scenarios and industry leading guest speakers.
Are you ready to learn more or get more out of PHP? If so join us for our next meeting here at OmniSpear.
You will find more detail on upcoming content and date on the Dayton PHP Meetup page.
Setting up an Ubuntu 14.04 LEMP Server with the Nightly Build of PHP7
Install nginx
apt-get update
apt-get install nginx
Install and secure MySQL
apt-get install mysql-server
mysql_install_db
mysql_secure_installation
Add Zend repo and install PHP7
echo "deb http://repos.zend.com/zend-server/early-access/php7/repos ubuntu/" >> /etc/apt/sources.list
apt-get update
apt-get install php7-nightly
Configure PHP7 php-fpm.conf
cd /usr/local/php7/etc
cp php-fpm.conf.default php-fpm.conf
nano php-fpm.conf
Uncomment/Change
pid = /var/run/php7-fpm.pid
Uncomment/Change
error_log = /var/log/php-fpm.log
Configure PHP7 www.conf
cd /usr/local/php7/etc/php-fpm.d
cp www.conf.default www.conf
nano www.conf
Change
user = www-data
Change
group = www-data
Uncomment
listen.allowed_clients = 127.0.0.1
Uncomment
security.limit_extensions = .php .php3 .php4 .php5 .php7
Configure PHP7
wget -O /etc/init.d/php7-fpm "https://gist.github.com/bjornjohansen/bd1f0a39fd41c7dfeb3a/raw/f0312ec54d1be4a8f6f3e708e46ee34d44ef4657/etc%20inid.d%20php7-fpm"
chmod a+x /etc/init.d/php7-fpm
touch /etc/init/php7-fpm.conf
nano /etc/init/php7-fpm.conf
Add the following to php7-fpm.conf
exec /usr/local/php7/sbin/php-fpm --nodaemonize --fpm-config /usr/local/php7/etc/php-fpm.conf
Add the checkconf file for PHP7
touch /usr/local/lib/php7-fpm-checkconf
    nano /usr/local/lib/php7-fpm-checkconf
Add the following to the php7-fpm-checkconf
#!/bin/sh
set -e
errors=$(/usr/local/php7/sbin/php-fpm --fpm-config /usr/local/php7/etc/php-fpm.conf -t 2>&1 | grep "\[ERROR\]" || $
if [ -n "$errors" ]; then
    echo "Please fix your configuration file..."
    echo $errors
    exit 1
fi
exit 0
Configure PHP7 continued
chmod a+x /usr/local/lib/php7-fpm-checkconf
update-rc.d -f php7-fpm defaults
ln -s /usr/local/php7/bin/php /usr/local/bin/php
ln -s /usr/local/php7/sbin/php-fpm /usr/sbin/php-fpm
service php7-fpm start
Set up nginx config
cd /etc/nginx/sites-available
cp default (your site here).conf
nano (your site here).conf
Configure your config as needed (example script below)
server {
        listen *:80;
        server_name (server name here);

        root /usr/share/nginx/html;
        index index.php index.html index.htm;

        client_max_body_size 1m;

        error_log /var/log/nginx/(your site here).error.log;
        access_log /var/log/nginx/(your site here).access.log;

        location / {
                try_files $uri $uri/ /index.php$is_args$args;
        }

        location ~ \.php$ {
                fastcgi_index index.php;
                fastcgi_split_path_info ^(.+\.php)(/.*)$;
                try_files $uri $uri/ /index.php$is_args$args;
                fastcgi_pass 127.0.0.1:9000;
                include /etc/nginx/fastcgi_params;
                fastcgi_param SCRIPT_FILENAME $request_filename;
                fastcgi_param APP_ENV dev;
        }
}
Continue set up nginx
ln (your site here).conf ../sites-enabled/(your site here).conf
rm ../sites-enabled/default
Restart services
service php7-fpm restart
service nginx restart
Photoshop Tutorial – Adding Motion Effects With Radial Blur Filter
The radial blur filter allows us to enhance an image by adding a zoom effect. This is a powerful effect that will require us to mask out parts of the image to preserve our subject. In this example we are focusing on the vintage BMW 2002tii sports car. Take note of the flat focus of original image, although slightly dramatic we will use radial blur to add some excitement.

Original Image

Image with radial blur effect added
In order to create this result we start by duplicating our background image layer twice for a total of three layers. Select your background then go to: Layers -> Duplicate Layer… Let’s rename the top two layers radius 20 and radius 40.
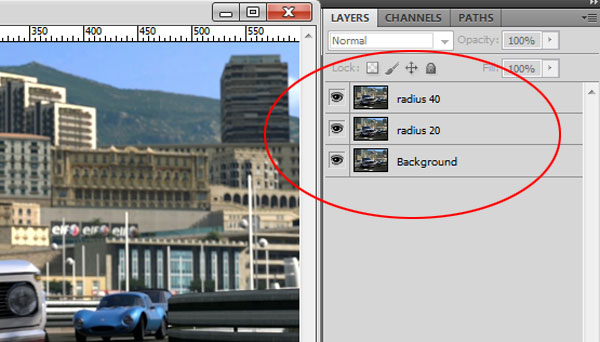
Our next step is to add the filter effect to each of the duplicated layers. We start by selecting the radius 20 layer and adding: Filter -> Blur -> Radial Blur… This will bring up the options for the effect. We set the effect for this as follows: Amount = 20, Blur Method = Zoom, Quality = Best. We also drag the Blur Center to the approximate location of our subject, the BMW sports car.
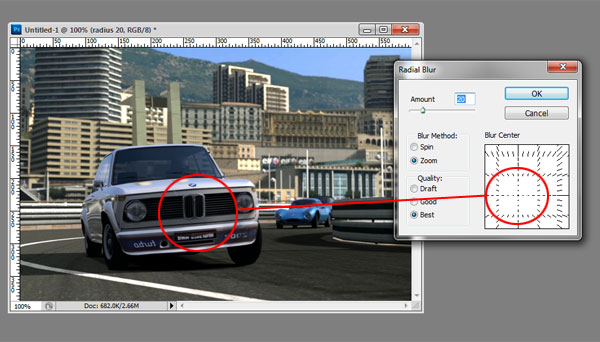
There is no built-in preview for this effect so you will need to make your best guess. It may take a few attempts to get your focus point set for the Blur Center.

The resulting layer will have blurred image radiating out from our center point
Our next step will be to replicate this effect on the radius 40 layer. Add the filter effect and only change the amount from 20 to 40. Do not change anything else in the settings for the Radial Blur except for the amount. It should result in a layer with a greater blur effect.

The result is a more intensely blurred layer
Our next steps will involve the use of layer masking to reveal our sports car amongst the blur effects. Select each of the radius layers and add a layer mask to each one. There is a handy shortcut button for this located in the footer of the layers window that will add the mask to the selected layer.
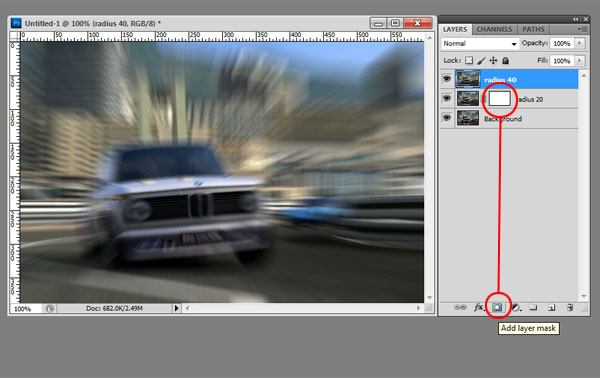
Adding layer masks
Repeat this process for both of the radius layers, we will reveal the focused object from each layer.
Start by hiding the radius 40 layer by clicking the small eye icon in the layers window. Then select the layer mask (white rectangular block) on the radius 20 layer. With the layer mask selected, choose your gradient tool and make sure the color palette is set to pure black and white. Also make sure your gradient is set to: Radial Gradient. Select the center of your object and drag the radius out to the edge of your intended focus area. This will result in a center focused image with blurry edges.

Setting the Radial Gradient
Our next step is to manually brush-in more of the focus object. We achieve this by selecting the paintbrush tool, giving it a manageable brush size and setting the opacity lower. For this image, we set it to 50%. If the opacity is set too high the resulting mask will have harsh edges and produce an unnatural result. Brush around your object until the points of focus start to show through.
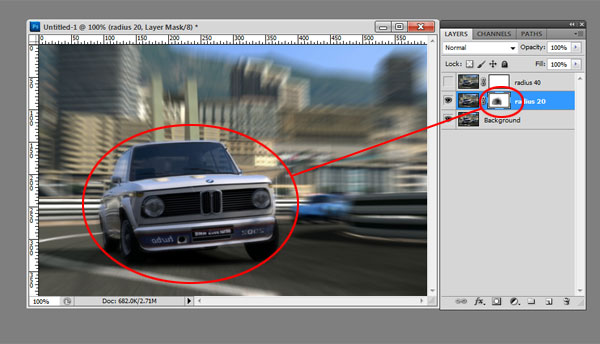
Masking the layer
Repeat this same masking process for the radius 40 layer. This will result in having your focus object completely visible and everything else blurred. The final step is to adjust the opacity of the radius 40 and radius 20 layers. The amount set is completely subjective. You will need to find the balance that works for you. We set the opacity to 75% for both layers in this example.
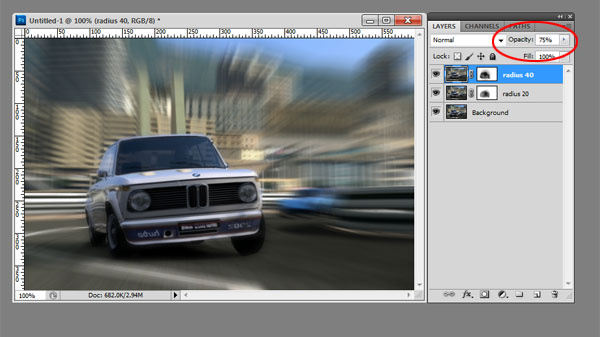
Setting the layer opacity
Once you are satisfied, save your image into your desired format. Don’t forget to have some fun with it!
Regression testing of websites with just a little JavaScript.
In my past professions whenever the word “testing” came up, there were usually one of two follow-up actions to take on my part as a developer.
– Get with a group of testers and draft a Q&A (quality assurance) specification.
– I would be the one stuck with the task of programming test scripts in some language that would take quite a bit of time (I was using Borland Silk Test version 6 and I’m quite sure the latest is a dramatic improvement).
As I spend most of my time in Javascript, it would be nice to create standard automated regression tests in the same realm of my skill set (i.e. web technologies). And that’s where PhantomJS comes in. For those web developers who have used the Console window inside their browser cranking out console.log statements will be right at home with PhantomJS.
What is it? It’s a headless (something you can’t see) web browser based on WebKit that is “scriptable”. Imagine a console terminal application that can be programmed to go to a web site which performs the following:
– Calculates the time it takes to load the page.
– Performs some validation. When the script enters a letter instead of a integer (inside a input box), does it error like it’s suppose to?
– Automated action. Fill in the input fields and click on the submit button.
If you’re comfortable using jQuery, you can simply load it in the PhantomJS environment and off you go. Here’s a taste of a PhantomJS script that goes to www.omnispear.com to print out all the blog headings:
var page = require('webpage').create();
page.onConsoleMessage = function(msg) {
    console.log(msg);
};
page.open("http://www.omnispear.com", function(status) {
    if (status === "success") {
        page.includeJs("http://ajax.googleapis.com/ajax/libs/jquery/2.1.1/jquery.min.js", function() {
            page.evaluate(function() {
                var blogs = $('#blog_feed_text');
                $(blogs).find('.wp-title a').each(function(i) {
                    console.log($(this).html());
                });
            });
            phantom.exit();
        });
    }
});
I’ve been following the development of PhantomJS since it first came out in 2011 and I am excited about where the project is heading. If testing websites is something that is in the back of your mind, you definitely should check it out.


